Okay, in my last art post, Juanito asked how I went about painting the image. So, today my young padawans... I'll go over the steps I've used to get the Klisk image to it's current state (which unfortunately due to time constraints at work and some other issues, is still where it was last week...). I'm going to refer to Photoshop alot, because I use that for most of my starting work, and then move on to Painter. But for ease of this post, when I refer to Photoshop, just insert your favorite Painting/Drawing software.
Anyway, I usually try to work at 300 dpi. And my image size usually stays around 8 x 10 inches, but it varies with the shape and project. I start off in Photoshop with a blank, colored canvas. Usually dark green to help me get some green and yellow into my skin tones, seeing as I have a habit of painting a little too warm. I'm going to have images of each stage I talk about, so you can see what I'm doing, but I figure you've all seen a blank sheet of green paper, or a green canvas in any one of your photo manipulation/painting programs, so you don't need to see one again to know what I'm talking about.
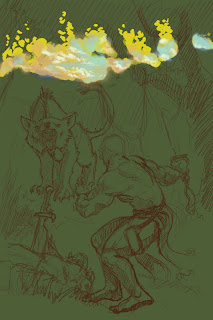
I then come to the sketch portion of the drawing. I do this in one of two ways. The first being your traditional pencil and paper route, which I then take the sketch when finished, scan it in and move on to the next step. Or the Second route, in which I draw directly in Photoshop. This is the path I took with the picture in question. I was staying late after work one night, waiting for a ride home, and just started sketching in Photoshop and came up with the image. I must admit, that while I've done lots of drawings on the computer using my mouse, I am quite glad to be using a 6X9 Wacom Tablet for all of my digital painting. If you don't have a tablet, and aren't a savant with the mouse, then I suggest the traditional pen and paper route at this stage. Anyway, after my sketch was finished, I was left with this:

Now, whether I sketch directly in Photoshop or scan in a sketch, I like to keep my sketch on a different layer from my background/canvas and the color layer, or layer that I do my painting on. If you've scanned in a sketch, turn the sketch layer into a multiply layer, which enables the underlying layers to show through (but beware this will darken your colors and whatnot, so if you plan on deleting the sketch layer when you're finished, your underlying color layers will be brighter than what you were looking at when the multiply layer was there). If you've sketched directly into Photoshop, then simply sketch on a different layer than the background and you're set.
Okay, now that the sketch is in, it's time to start working on the background. I was taught to work from the back forward, but you don't have to do it that way. I'm doing a lunch-time painting session with an artist friend at work, and we've been trying to increase our speed in Photoshop, so I've started trying to lay down all the base colors I'll use and then go in for the finish work, but in this current piece, I've started at the back. So I start on the sky and clouds on a separate layer from the background, and end up with this:
Next, we move on to the mountains. I wanted to give the hint that while the foreground had a warm, summer feel to it, I wanted the mountains to be cold, and rugged. Anyway, I put the mountains on a separate layer just on top of the layer with the Clouds. Here's what I got next:

Next, I start to add in the trees. Again, on a separate layer from the rest of the image. Here it is:
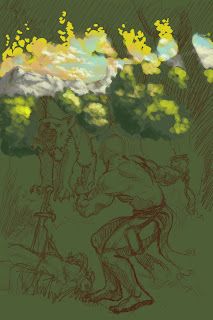
Now as you can see, the trees are pretty bright. I wanted to give the image a sense of depth, so I needed to tone down the trees and bring down the contrast, so that the foliage doesn't blow out your retinas and also so as to not compete with the contrast that will be in the subject of the painting. While I'm toning down the trees, I wanted to start blocking in the trees above the Klisk, basically the mid-ground area. So I ended up with this: (which is the current state of the image)
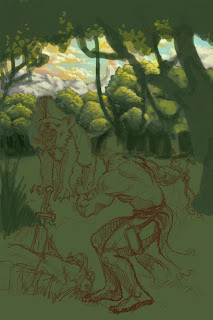
So there you have it. The next step will be painting in the Trees that I've just blocked in, and adding the ground underneath the big, dog/bear thing (I wish it was the man/bear/pig from South Park, but unfortunately, it's not. Besides, Al Gore killed it). Then add the ground and shrubbery underneath and behind the Klisk, and then the klisk and the killed game next, followed by the bushes in the foreground.
To finish it all off, I'll probably take it in to Painter and give it all a once over in there, just because I'm like that.
Now, I didn't want to put this up as the rule on how to draw and paint in Photoshop. There are far better artists than me who can teach you how to do that. I just wanted to answer Jaunito's question. Hopefully I did, and hopefully Juanito and anyone else out there who wants to do some art will submit their work, so we can all enjoy it.
Until next time...

 There have been a few questions reguarding "Cloaking" lately. In MOAG Cloaking is refered to as three different things.


